
This is the third part of my article on getting started with CloudXR with the Oculus Quest. Part 1 is an introduction to the technology, and about registering and applying for access to CloudXR and AWS, while the second part is about the installation of CloudXR on AWS. This final third part is about the installation of CloudXR on the Oculus Quest.
You can find part 1 here, and part 2 here.
Set up CloudXR on Oculus Quest
Now it is time to install CloudXR on your Oculus Quest or Quest 2. For this, you first need to install SideQuest on your computer.
Install SideQuest
The CloudXR app for Oculus Quest comes as an APK file, which is the standard installation file type for Android apps. In order to install an APK file on the Oculus Quest, you need to use an external software. For this purpose, SideQuest is very easy to use. You can download SideQuest and find the installation guide at sidequestvr.com/setup-howto.
Start by downloading the installation file for your operating system. For example, if you are running Windows, click on Download for Windows 10 X64. Then follow the installation of SideQuest with the default options.
If you are running Windows, you also need to install the drivers for the Oculus Quest. Head to developer.oculus.com/downloads/package/oculus-adb-drivers, agree to the terms of the license, and click Download. Extract the zip file that was downloaded, extract it anywhere, right click the android_winusb.inf file, and click install.
Register as a developer
In order to install APKs on your Oculus Quest, you also need to be registered as a developer. Head to auth.oculus.com and either sign in or register a new account.
Then head to developer.oculus.com/manage/verify, and you’ll be asked to add your credit card or mobile number to verify your identity. Registering as a developer does not cost anything — this is just for verification purposes. When you had added your credit card or mobile number, you will get a notification that the verification was successful. Click Back to home, which will send you to developer.oculus.com/manage/organizations/create/ where you can create your organization.

Enter the name of your organization. If you have not decided on a name previously, you can just come up with one now. Then click I understand if you understand the conditions, and then Submit. Read through the NDA that pops up and click I Agree if you agree, and then Submit.
You are now an official Oculus developer!
Enable developer mode on your Oculus Quest
In addition to be registered as a developer, you need to enable developer mode on your Oculus Quest.
First, install the Oculus app on your Android or iOS device, and log in with the Oculus account you registered as a developer. Make sure that Bluetooth is enabled on your phone, and that your Oculus Quest is started. Then tap Pair New Headset in the Oculus app. Select your headset, enter the 5-digit code, and the pairing is done.
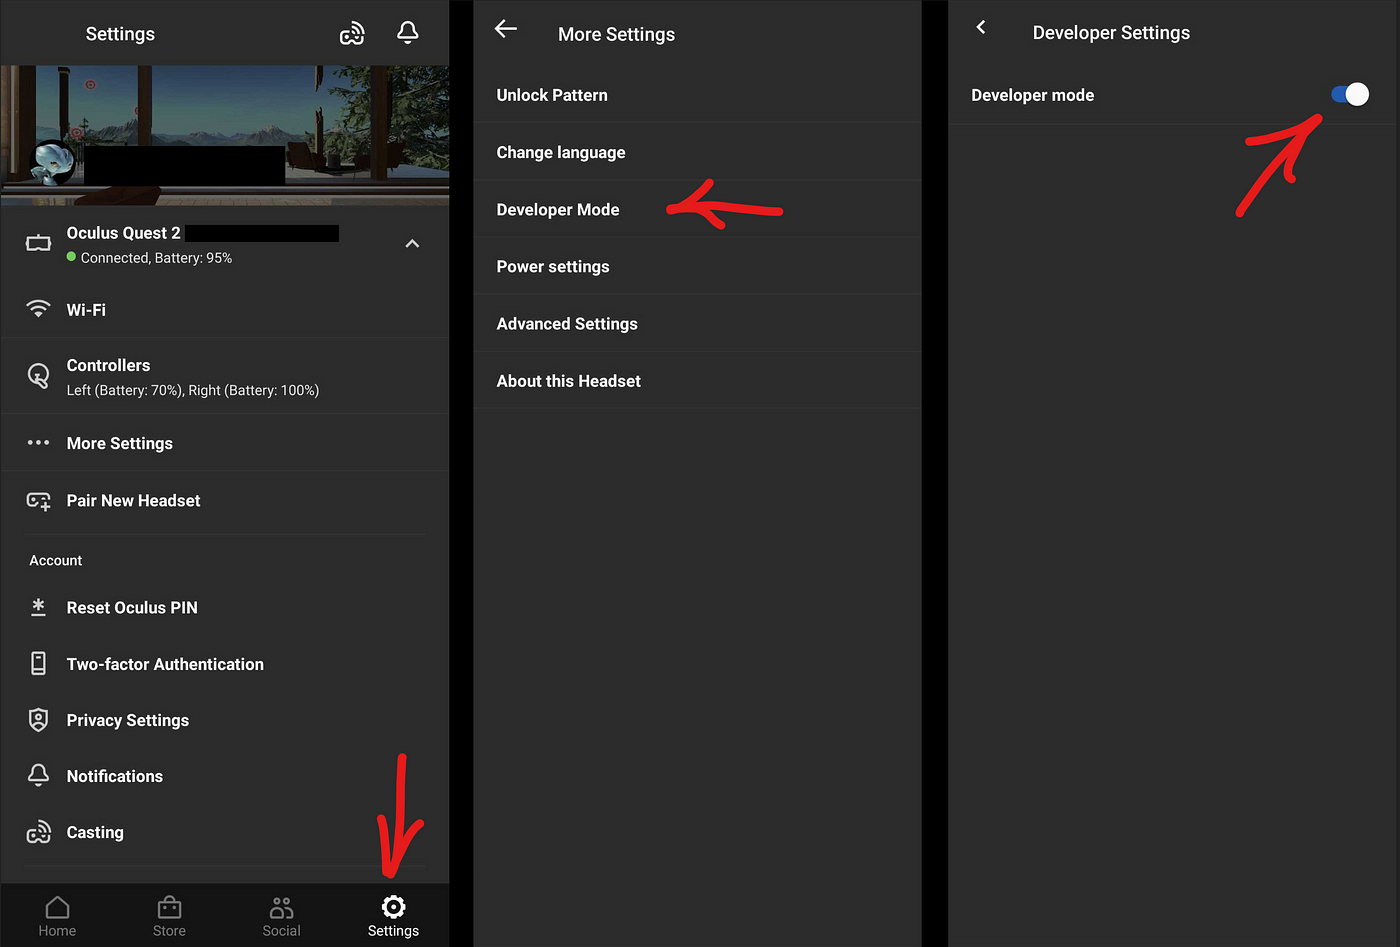
Tap Settings, then More Settings, then Developer Mode, and toggle the Developer mode to on position.
Install CloudXR on your Oculus Quest
You are almost ready! Now start SideQuest, and connect your Oculus Quest to your PC using a USB cable. Take on your headset and grab a controller, and accept both USB debugging and that your PC can access the files on your headset.
Head back to developer.nvidia.com/nvidia-cloudxr-sdk-get-started (you might have to agree to the license agreement once more), scroll down slightly to find the Download button and click it. This will download a zip file, which you will have to extract.
Create a new text file anywhere and name it CloudXRLaunchOptions.txt. Open this file and type in:
-s [the external IP of your virtual machine]
For example, if the external IP of your virtual machine is 1.2.3.4, type in:
-s 1.2.3.4
Then save and close the file.

Now go back to SideQuest. First click the little box with an arrow pointing down (marked as 1 in the image). Navigate to the extracted CloudXR SDK folder you recently downloaded from Nvidia, and then to the subfolder Sample/Android/OculusVR/app. There, select the file ovr-sample.apk and click Open. Hopefully you will see the message All tasks completed! in the bottom of SideQuest.
Still in SideQuest, click the little folder (marked as 2 in the image). This will open the file explorer, where you can see the files on your Oculus Quest. Its default location is /sdcard, and this is where you want to stay. In your PC’s file explorer, navigate to the CloudXRLaunchOptions.txt file that you created, and drag it to the SideQuest file explorer. Again you should hopefully see the message All tasks completed!
You have now successfully installed Nvidia CloudXR, and are ready to try out some games!
Installing and Running a game
Now it is time to install and run the games. Take on your Oculus Quest headset.

Navigate to Apps > Unknown Sources, and run the CloudXR Client. The headset should now automatically connect to your virtual machine.

You will be greeted by SteamVR, and is adviced to press the left controller menu button to bring up the dashboard.

You can now install any game in your Steam library. I personally installed Half-Life: Alyx, and it runs very well!

Enjoy your VR Gaming in the Cloud!
Turning off your virtual machine
Your new virtual machine will cost around $0.7 — $1.2 USD per hour it is running, so you might want to turn it off every time that you are done using it.

You can do this by logging in to the remote desktop in the web browser, or by going to AWS’ list of EC2 instances, selecting your virtual machine, clicking Instance state, and Stop instance.
Other parts
Part 1, Applying for CloudXR and AWS
Part 2, Installing on AWS
Part 3, Installing on Oculus Quest
